Using Google’s Universal Analytics to Track Syndicated Content
Google’s approach to analytics has really grown up, and with their Universal Analytics Beta, the ability to shape GA into what YOU want is rapidly approaching. This tutorial aims to help users track a piece of content as it is deployed across a network of websites.
Why Track Syndicated Content?
Content syndication on the Internet can be a very disjointed process, and furthermore, measuring analytic data on said syndicated content is an even more piecemeal process. Internet marketers and search engine optimizers now see the benefits of having your content ripped to other sites (with links to the source of course). But, syndication is about more than Google’s Page Rank. It use to be about hitting a massive number of eyeballs. By giving strategy to your analytics data capturing, you can make decisions about the content you distribute in the future. You may find:
- A more concrete number of impressions your content had
- Which networks and websites generated the most traffic for your content
- New blogs and websites for which to syndicate your content
There are many ways to track content as it trickles across the web. This way uses Google Analytics. It makes use of their free solutions which have evolved to a degree where all of this is now possible. Buckle up!
Set Up Google Analytics
- Create a Google Analytics account. I’m not going to go through all the baby steps here. Set one up.
- Within GA, you’ll want to create a new account. They’ll ask if you want to track a Website or Mobile app. Choose Website, and choose Universal Analytics.
- For the Account Name, call it something like “[YOUR BUSINESS NAME] – Syndication.”
- The website name could just be your company’s website. Same goes for the website URL. The URL will not matter as we’ll see later.
- Choose the appropriate Industry that represents you and your clients and time zone as well.
- Accept Google’s Terms of Service
- On the screen that follows with your tracking code, copy it and paste it to a secure location. The part we want looks like: UA-45852066-1.
Set Up a Custom Filter
Google Analytics allows for custom filters that can do all kinds of magic. The one we’re going to apply makes sure you see the full URL of content being accessed. By default GA will cut off parts of the URL that it thinks should be uniform across all the links on a website. Normally, users track traffic on only one website so this makes sense that they would do that. Most of the time a person accessing a site link appears like this in GA:
/comics/columbus_day
When in reality, the full URL looks like this:
theoatmeal.com/comics/columbus_day
What is missing is the actual website that was accessed. We can get that part of the URL back by using Google’s Analytics filters.
 First, from the Admin screen for your new account, click All Filters, then the +New Filter button.
- Name the filter something like, “Domain Distinction,” then click Custom Filter and then Advanced
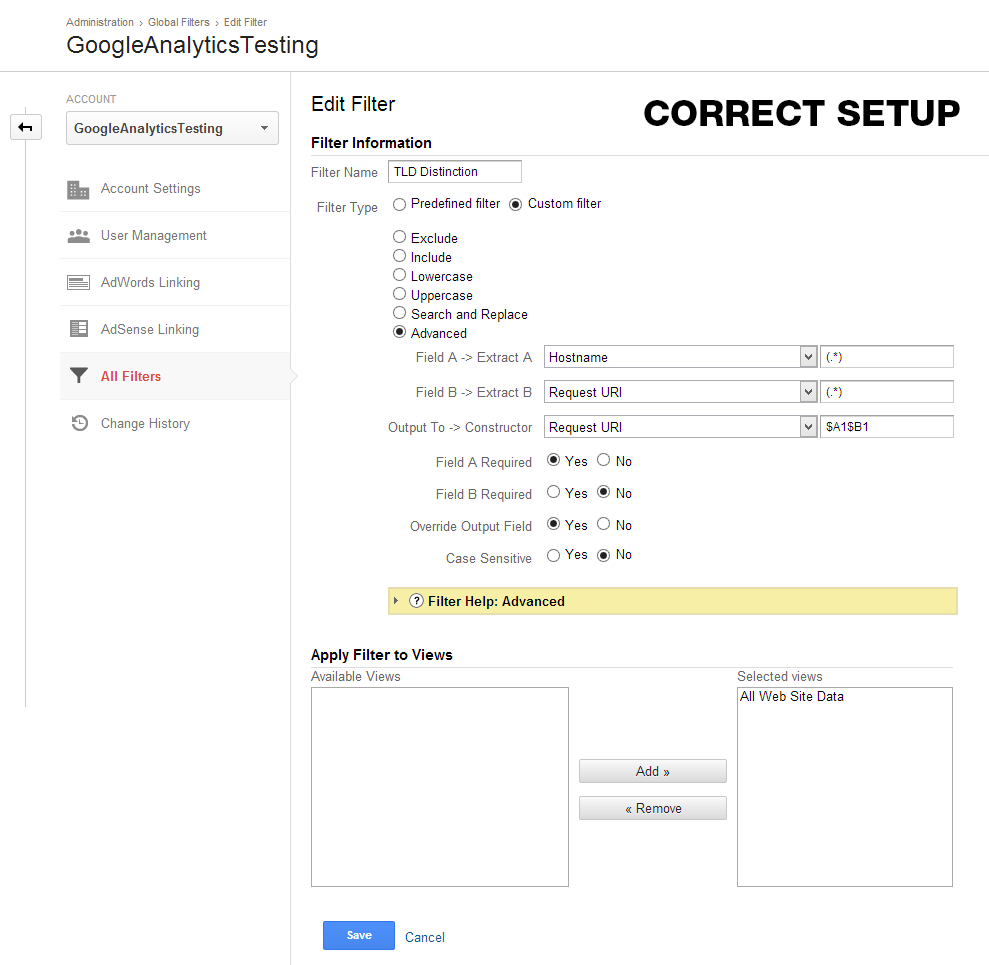
- Under Field A -> Extract A, select Hostname in the first box, and then type (.*) in the second box
- In the Field B -> Extract B, select Request URI in the first box, and then type (.*) in the second box
- In the Output To -> Constructor, select Request URI in the first box, and then type $A1$B1 in the second box
- Mark Field A Required to Yes, Field B Required to No, Override Output Field to Yes and Case Sensitive to No
- Under Apply Filter to Views, select All Web Site Data and click Add>>

I know it’s quite a few steps to achieve such a small reward, but it is critical to seeing the full paths of your content as it is accessed on—hopefully—thousands of websites. See the image below to check you followed the steps correctly:
Pulling it All Together — Creating the Tracking Code
At this point, most of the hard work is over. All you need now is a little snippet of code I developed:
<script type="text/javascript">var theUrl = document.URL;var theUrlArray = theUrl.split("//");var theUrlpre = theUrlArray[1];var theUrlpostArray = theUrlpre.split("/");var theUrlpost = theUrlpostArray[0];(function(
Pay close attention to the UA-45852066-1 in that script. In order for this to work, you need to use the ID associated with your own account to make this work. This is in essence, the same tracking code that Google provided you when you created your account. I’ve modified it however, to change the URL parameter Google is looking for, to match whatever website the content is being accessed from. Simply trade out the UA (User Account) number with your own, and you are good to go.
UPDATE: Caveat Found
When I first posted this article there was an issue with my code snippet that could potentially cause problems. The code has been altered to work now. The problem revolved around someone using two google analytics tracking codes on the same page. The old solution would still work, but only if it was the first instance of Google Analytics tracking code on the page. For our usage, this simply wasn’t acceptable. The updated code now includes {‘name’:’uniqueTrackerName’}, and when we send data, we again call ‘uniqueTrackerName.send’ to ensure it works. You can call the name anything you want. It could be your company name, such as ‘huebrisTracker’ or it could probably stay uniqueTrackerName if you want. Basically, this is the proper way to send tracking data to multiple properties using Universal Analytics.
Where Do I Use This Snippet?
Anywhere your content is made available, use your tracking snippet! I think this would be especially great for infographics. If you can, give people HTML versions of your content. Let them copy it to their computer’s clipboard, and include your tracking snippet along with the HTML to your article/infographic/video embed/etc. If you have access to the websites that will carry your content—maybe they use WordPress—simply go to the text/html view and add your snippet. *Note: Going back and forth between Text and Visual views in WordPress can/will alter custom code in the editor. Go to the Text view and add your tracking code as a last step before publishing.
Enjoy Analytics from Your Syndicated Content!
Finally, sit back and watch the data roll in. Over time, most of your research will happen on the Behavior > Site Content section of Google Analytics. Here you can see which pages and sites were the most popular for your content. If you want to distinguish between content syndication “campaigns” where you can drill down to a specific piece of content vs another, I would suggest creating a new Property under the admin page for your syndication account. The new Property will essentially create a new UA number that is similar to your old one, but the last number in it will increment by one. A new Property’s User Account number would change from UA-45852066-1 to UA-45852066-2 for example. Update your tracking snippet on your separate syndication campaign to match your new number and you are done. The filters are already in place on the Account level, so you don’t have to recreate them from scratch for every property—yay! As it happens, all you need to do filter-wise, is include the All Web Site Data view. Under the Account, click Filters, and then the filter name you chose earlier. Click the unassigned view (it will be called All Web Site Data, unless you changed it), and then click Add. All done.
This is one of the more robust tutorials on our blog, so if you have any trouble, please just shoot me an email.